


ansible简介
ansible是什么?
Ansible是一个自动化统一配置管理工具,自动化主要体现在Ansible集成了丰富模块以及功能组件,可以通过一个命令完成一系列的操作,进而能减少重复性的工作和维护成本,可以提高工作效率。
ansible的特点
部署简单,只需在主控端部署Ansible环境,被控端无需做任何操作;
默认使用SSH协议对设备进行管理;
有大量常规运维操作模块,可实现日常绝大部分操作;
配置简单、功能强大、扩展性强;
支持API及自定义模块,可通过Python轻松扩展;
通过Playbooks来定制强大的配置、状态管理;
轻量级,无需在客户端安装agent,更新时,只需在操作机上进行一次更新即可;
提供一个功能强大、操作性强的Web管理界面和REST API接口——AWX平台。
ansible架构

从上图可知ansible的主要模块
Ansible:Ansible核心程序。HostInventory:记录由Ansible管理的主机信息,包括端口、密码、ip等。Playbooks:“剧本”YAML格式文件,多个任务定义在一个文件中,定义主机需要调用哪些模块来完成的功能。CoreModules:核心模块,主要操作是通过调用核心模块来完成管理任务。CustomModules:自定义模块,完成核心模块无法完成的功能,支持多种语言。ConnectionPlugins:连接插件,Ansible和Host通信使用
ansible的执行流程
加载自己的配置文件,默认
/etc/ansible/ansible.cfg;查找对应的主机配置文件,找到要执行的主机或者组;
加载自己对应的模块文件,如 command;
通过ansible将模块或命令生成对应的临时py文件(python脚本), 并将该文件传输至远程服务器;
对应执行用户的家目录的
.ansible/tmp/XXX/XXX.PY文件;给文件 +x 执行权限;
执行并返回结果;
删除临时py文件,
sleep 0退出;
ansible的使用
ansible安装
首先要安装epel源
wget -O /etc/yum.repos.d/epel.repo http://mirrors.aliyun.com/repo/epel-7.repo也可以参考阿里云镜像源设置:https://developer.aliyun.com/mirror
安装ansible
yum -y install ansible查看ansible的版本(显示版本信息说明安装成功)
ansible --versionanansible 程序结构
安装目录如下(yum安装):
配置文件目录:/etc/ansible/
执行文件目录:/usr/bin/
Lib库依赖目录:/usr/lib/pythonX.X/site-packages/ansible/
Help文档目录:/usr/share/doc/ansible-X.X.X/
Man文档目录:/usr/share/man/man1/
ansible配置介绍
#inventory      = /etc/ansible/hosts      #主机列表配置文件
#library        = /usr/share/my_modules/  #库文件存放目录
#remote_tmp     = ~/.ansible/tmp          #临时py文件存放在远程主机目录
#local_tmp      = ~/.ansible/tmp          #本机的临时执行目录
#forks          = 5                       #默认并发数
#sudo_user      = root                    #默认sudo用户
#ask_sudo_pass = True                     #每次执行是否询问sudo的ssh密码
#ask_pass      = True                     #每次执行是否询问ssh密码
#remote_port    = 22                      #远程主机端口
host_key_checking = False                 #跳过检查主机指纹
log_path = /var/log/ansible.log           #ansible日志

#普通用户提权操作
[privilege_escalation]
#become=True
#become_method=sudo
#become_user=root
#become_ask_pass=False
ansible常用命令
ansible测试连通性
场景一:基于密码连接
#方式一、IP+端口+用户+密码
#配置介绍
#主机地址 ansible_ssh_port=端口 ansible_ssh_user=连接使用的用户 ansible_ssh_pass=密码
#例
172.16.1.7 ansible_ssh_port=22 ansible_ssh_user=root ansible_ssh_pass='root'

#方式二、使用组配置
[webs]
172.16.1.7 ansible_ssh_user=root ansible_ssh_pass='root'

方式三、使用变量
[webs]
172.16.1.7
172.16.1.8

[webs:vars]
ansible_ssh_user=root
ansible_ssh_pass='root'
ansible_ssh_port=22
场景二:基于ssh免密钥连接
#1.ansible服务器生成ssh秘钥对
ssh-keygen

#将公钥推送到被管理端
ssh-copy-id -i .ssh/id_rsa.pub 172.16.1.7
ssh-copy-id -i .ssh/id_rsa.pub 172.16.1.8

#3.配置主机清单(/etc/ansible/hosts)
#方式一
[webs]
172.16.1.7
172.16.1.8
#方式二
web01 ansible_ssh_host=172.16.1.7
web02 ansible_ssh_host=172.16.1.8

[webs]
web01
web02


#补充,可以将多个组放到一个组里
#例
[webs]
172.16.1.7
172.16.1.8

[nfs]
172.16.1.31

[lnmp:children]
dbs
webs
配置完测试连通性
ansible webs -m ping

查看ansible组下的所有IP
[root@m01 ~]# ansible all --list
  hosts (4):
    172.16.1.7
    172.16.1.8
    172.16.1.31
    172.16.1.51
ansible之ad-hoc
什么是ad-hoc?
ad-hoc简而言之就是“临时命令”,执行完即结束,并不会保存
ad-hoc的命令使用

ansible的结果会返回带颜色的结果
绿色: 代表被管理端主机没有被修改
黄色: 代表被管理端主机发现变更
红色: 代表出现了故障,注意查看提示
ansible-doc命令
查看模块的帮助信息
#例
ansible-doc shell
setup模块
#查看ansible远程主机的基本信息
[root@m01 ~]# ansible 172.16.1.7 -m setup

#可以使用filter过滤其中的某一项
#例:获取主机的网卡信息
[root@m01 ~]# ansible 172.16.1.7 -m setup -a 'filter=ansible_default_ipv4'
ansible的常用模块
command             # 执行shell命令(不支持管道等特殊字符)
shell               # 执行shell命令
scripts             # 执行shell脚本
yum_repository      # 配置yum仓库
yum                 # 安装软件
copy                # 变更配置文件
file                # 建立目录或文件
service             # 启动与停止服务
mount               # 挂载设备
cron                # 定时任务
get_url             #下载软件
firewalld           #防火墙
selinux             #selinux
command模块
这个模块可以直接在远程主机上执行命令,并将结果返回本主机。
例
#查看组内主机172.16.1.7的磁盘信息
[root@m01 ~]# ansible 172.16.1.7 -m command -a 'df -h'
172.16.1.7 | CHANGED | rc=0 >>
Filesystem      Size  Used Avail Use% Mounted on
devtmpfs        476M     0  476M   0% /dev
tmpfs           487M     0  487M   0% /dev/shm
tmpfs           487M   14M  473M   3% /run
tmpfs           487M     0  487M   0% /sys/fs/cgroup
/dev/sda3        18G  2.0G   16G  12% /
/dev/sda1      1014M  132M  883M  13% /boot
tmpfs            98M     0   98M   0% /run/user/0
命令模块接受命令名称,后面是空格分隔的列表参数。给定的命令将在所有选定的节点上执行。它不会通过shell进行处理,比如$HOME和操作如"<",">","|",";","&" 工作(需要使用(shell)模块实现这些功能)。注意,该命令不支持| 管道命令。
shell模块
shell模块可以在远程主机上调用shell解释器运行命令,支持shell的各种功能,例如管道等
例
[root@m01 ~]# ansible 172.16.1.7 -m shell -a 'cat /etc/passwd |grep "root"'
172.16.1.7 | CHANGED | rc=0 >>
root:x:0:0:root:/root:/bin/bash
operator:x:11:0:operator:/root:/sbin/nologin
只要是我们的shell命令,都可以通过这个模块在远程主机上运行,这里就不一一举例了。
script模块
指定本地的脚本文件,到远程主机运行一次
注意:和 shell 模块的不同,shell 模块是要求客户端上有这个脚本才能执行;script 是要求 ansible 服务端有这个脚本就可以了,执行的时候是不会拷贝这个脚本到客户端的。
相关模块如下:
chdir: 此参数的作用就是指定一个远程主机中的目录,在执行对应的脚本之前,会先进入到 chdir 参数指定的目录中cmd: Path to the local script to run followed by optional arguments.creates: 使用此参数指定一个远程主机中的文件,当指定的文件存在时,就不执行对应脚本,可参考 command 模块中的解释。decrypt: This option controls the autodecryption of source files using vault.executable: Name or path of a executable to invoke the script with.free_form: Path to the local script file followed by optional arguments.removes: 使用此参数指定一个远程主机中的文件,当指定的文件不存在时,就不执行对应脚本,可参考 command 模块中的解释。
# 在本地准备一个测试脚本
[root@master ~]# echo -e "pwd\nhostname" > /root/test.sh
[root@master ~]# cat test.sh
pwd
hostname

#测试
[root@master ~]# ansible 172.16.1.7 -m script -a "/root/test.sh"
yum模块
用于下载
相关模块如下
name=#所安装的包的名称state=#present--->安装,latest--->安装最新的,absent---> 卸载软件。update_cache#强制更新yum的缓存conf_file#指定远程yum安装时所依赖的配置文件(安装本地已有的包)。disable_pgp_check#是否禁止GPG checking,只用于presentorlatest。disablerepo#临时禁止使用yum库。 只用于安装或更新时。enablerepo#临时使用的yum库。只用于安装或更新时。
下载一个软件试一下
[root@m01 ~]# ansible 172.16.1.7 -m yum -a 'name=lrzsz state=present'
172.16.1.7 | CHANGED => {
    "ansible_facts": {
        "discovered_interpreter_python": "/usr/bin/python"
    },
    "changed": true,
    "changes": {
        "installed": [
            "lrzsz"
        ]
    },
    "msg": "",
    "rc": 0,
    "results": [
        "Loaded plugins: fastestmirror\nLoading mirror speeds from cached hostfile\n * base: mirrors.aliyun.com\n * extras: mirrors.aliyun.com\n * updates: mirrors.aliyun.com\nResolving Dependencies\n--> Running transaction check\n---> Package lrzsz.x86_64 0:0.12.20-36.el7 will be installed\n--> Finished Dependency Resolution\n\nDependencies Resolved\n\n================================================================================\n Package         Arch             Version                  Repository      Size\n================================================================================\nInstalling:\n lrzsz           x86_64           0.12.20-36.el7           base            78 k\n\nTransaction Summary\n================================================================================\nInstall  1 Package\n\nTotal download size: 78 k\nInstalled size: 181 k\nDownloading packages:\nRunning transaction check\nRunning transaction test\nTransaction test succeeded\nRunning transaction\n  Installing : lrzsz-0.12.20-36.el7.x86_64                                  1/1 \n  Verifying  : lrzsz-0.12.20-36.el7.x86_64                                  1/1 \n\nInstalled:\n  lrzsz.x86_64 0:0.12.20-36.el7                                                 \n\nComplete!\n"
    ]
}
copy模块
这个模块用于将文件复制到远程主机,同时支持给定内容生成文件和修改权限等。
相关模块如下:
src#被复制到远程主机的本地文件。可以是绝对路径,也可以是相对路径。如果路径是一个目录,则会递归复制,用法类似于"rsync"content#用于替换"src",可以直接指定文件的值dest#必选项,将源文件复制到的远程主机的绝对路径backup#当文件内容发生改变后,在覆盖之前把源文件备份,备份文件包含时间信息directory_mode#递归设定目录的权限,默认为系统默认权限force#当目标主机包含该文件,但内容不同时,设为"yes",表示强制覆盖;设为"no",表示目标主机的目标位置不存在该文件才复制。默认为"yes"others#所有的 file 模块中的选项可以在这里使用
看下示例:
#将当前目录的hosts拷贝到nfs端/opt目录下
[root@m01 /etc/ansible]# ansible nfs -m copy -a 'src=hosts dest=/opt/'
172.16.1.31 | CHANGED => {
    "ansible_facts": {
        "discovered_interpreter_python": "/usr/bin/python"
    },
    "changed": true,
    "checksum": "39e5473485d6dad35222821ff0dee7d45c501fb3",
    "dest": "/opt/hosts",
    "gid": 0,
    "group": "root",
    "md5sum": "dd2bac0849c095b95319d40f50c7d259",
    "mode": "0644",
    "owner": "root",
    "secontext": "system_u:object_r:usr_t:s0",
    "size": 79,
    "src": "/root/.ansible/tmp/ansible-tmp-1704202662.64-4725-249421398254191/source",
    "state": "file",
    "uid": 0
}

#修改目标文件的权限信息
[root@m01 /etc/ansible]# ansible nfs -m copy -a 'src=hosts dest=/opt/ owner=nfsnobody group=nfsnobody mode=0600'
172.16.1.31 | CHANGED => {
    "ansible_facts": {
        "discovered_interpreter_python": "/usr/bin/python"
    },
    "changed": true,
    "checksum": "39e5473485d6dad35222821ff0dee7d45c501fb3",
    "dest": "/opt/hosts",
    "gid": 65534,
    "group": "nfsnobody",
    "mode": "0600",
    "owner": "nfsnobody",
    "path": "/opt/hosts",
    "secontext": "system_u:object_r:usr_t:s0",
    "size": 79,
    "state": "file",
    "uid": 65534
}

#将content中的内容写入到目标文件中
[root@m01 /etc/ansible]# ansible nfs -m copy -a 'content=rsync_backup:123456 dest=/root/rsyncd.pass owner=nfsnobody group=nfsnobody mode=0600'
172.16.1.31 | CHANGED => {
    "ansible_facts": {
        "discovered_interpreter_python": "/usr/bin/python"
    },
    "changed": true,
    "checksum": "f628f3e5a0dcacffa1600d776d53da103f1a1b71",
    "dest": "/root/rsyncd.pass",
    "gid": 65534,
    "group": "nfsnobody",
    "md5sum": "fe822101e8da26b15274f8831bcaba33",
    "mode": "0600",
    "owner": "nfsnobody",
    "secontext": "system_u:object_r:admin_home_t:s0",
    "size": 19,
    "src": "/root/.ansible/tmp/ansible-tmp-1704202714.69-4779-53681144120660/source",
    "state": "file",
    "uid": 65534
}
file模块
该模块主要用于设置文件的属性,比如创建文件、创建链接文件、删除文件等。
常见选项:
force#需要在两种情况下强制创建软链接,一种是源文件不存在,但之后会建立的情况下;另一种是目标软链接已存在,需要先取消之前的软链,然后创建新的软链,有两个选项:yes|nogroup#定义文件/目录的属组。后面可以加上mode:定义文件/目录的权限owner#定义文件/目录的属主。后面必须跟上path:定义文件/目录的路径recurse#递归设置文件的属性,只对目录有效,后面跟上src:被链接的源文件路径,只应用于state=link的情况dest#被链接到的路径,只应用于state=link的情况state#状态,有以下选项:directory:如果目录不存在,就创建目录file:即使文件不存在,也不会被创建link:创建软链接hard:创建硬链接touch:如果文件不存在,则会创建一个新的文件,如果文件或目录已存在,则更新其最后修改时间absent:删除目录、文件或者取消链接文件
看下例子
#修改目标主机rsyncd.pass的权限信息
[root@m01 /etc/ansible]# ansible nfs -m file -a 'path=/root/rsyncd.pass owner=root group=root mode=0666'
172.16.1.31 | CHANGED => {
    "ansible_facts": {
        "discovered_interpreter_python": "/usr/bin/python"
    },
    "changed": true,
    "gid": 0,
    "group": "root",
    "mode": "0666",
    "owner": "root",
    "path": "/root/rsyncd.pass",
    "secontext": "system_u:object_r:admin_home_t:s0",
    "size": 19,
    "state": "file",
    "uid": 0
}

#在nfs的/opt目录下创建ansible.txt
[root@m01 /etc/ansible]# ansible nfs -m file -a 'path=/opt/ansible.txt state=touch'
172.16.1.31 | CHANGED => {
    "ansible_facts": {
        "discovered_interpreter_python": "/usr/bin/python"
    },
    "changed": true,
    "dest": "/opt/ansible.txt",
    "gid": 0,
    "group": "root",
    "mode": "0644",
    "owner": "root",
    "secontext": "unconfined_u:object_r:usr_t:s0",
    "size": 0,
    "state": "file",
    "uid": 0
}


#在nfs的/opt目录下创建test目录
[root@m01 /etc/ansible]# ansible nfs -m file -a 'path=/opt/test state=directory'
172.16.1.31 | CHANGED => {
    "ansible_facts": {
        "discovered_interpreter_python": "/usr/bin/python"
    },
    "changed": true,
    "gid": 0,
    "group": "root",
    "mode": "0755",
    "owner": "root",
    "path": "/opt/test",
    "secontext": "unconfined_u:object_r:usr_t:s0",
    "size": 6,
    "state": "directory",
    "uid": 0
}
sytemd模块
用来对服务的控制
常见选项
name: # 服务的名称
state: # 动作
started # 启动
stopped # 停止
reloaded # 重新加载
restarted# 重新启动
enabled: yes # 开机自动运行
看看例子:
#启动nfs服务
[root@m01 /etc/ansible]# ansible nfs -m systemd -a 'name=nfs state=started enabled=yes'

#停止nfs服务 禁止开机自动运行
[root@m01 /etc/ansible]# ansible nfs -m systemd -a 'name=nfs state=stopped enabled=no'

#停止firewalld防火墙 开机禁止运行
[root@m01 /etc/ansible]# ansible nfs -m systemd -a 'name=firewalld state=stopped enabled=no'
group模块
该模块主要用于添加或删除组。
常用的选项如下:
gid=#设置组的GID号name=#指定组的名称state=#指定组的状态,默认为创建,设置值为absent为删除system=#设置值为yes,表示创建为系统
例子如下:
#创建www组
[root@m01 /etc/ansible]# ansible nfs -m group -a 'name=www gid=666'
172.16.1.31 | CHANGED => {
    "ansible_facts": {
        "discovered_interpreter_python": "/usr/bin/python"
    },
    "changed": true,
    "gid": 666,
    "name": "www",
    "state": "present",
    "system": false
}
user模块
该模块主要是用来管理用户账号。
其主要选项如下:
comment# 用户的描述信息createhome# 是否创建家目录force# 在使用state=absent时, 行为与userdel –force一致.group# 指定基本组groups# 指定附加组,如果指定为(groups=)表示删除所有组home# 指定用户家目录move_home# 如果设置为home=时, 试图将用户主目录移动到指定的目录name# 指定用户名non_unique# 该选项允许改变非唯一的用户ID值password# 指定用户密码remove# 在使用state=absent时, 行为是与userdel –remove一致shell# 指定默认shellstate# 设置帐号状态,不指定为创建,指定值为absent表示删除system# 当创建一个用户,设置这个用户是系统用户。这个设置不能更改现有用户uid# 指定用户的uid
看看例子
#创建www用户
[root@m01 /etc/ansible]# ansible nfs -m user -a 'name=www uid=666 group=www shell=/sbin/nologin create_home=false'
172.16.1.31 | CHANGED => {
    "ansible_facts": {
        "discovered_interpreter_python": "/usr/bin/python"
    },
    "changed": true,
    "comment": "",
    "create_home": false,
    "group": 666,
    "home": "/home/www",
    "name": "www",
    "shell": "/sbin/nologin",
    "state": "present",
    "system": false,
    "uid": 666
}
mount模块
用于挂载磁盘
常见选项如下:
src: 挂载的网络文件系统路径(172.16.1.31:/data)
path: # 挂载的路径 挂载点
fstype: # 文件类型
state:
present: # 只写入fstab开机自动挂载
unmounted: # 只删除fstab中自动挂载项
mounted: # 挂载并写入开机自动挂载fstab
absent: # 卸载并删除开机自动运行
示例:
#客户端挂载
ansible webs -m mount -a 'src=需要挂载的源地址 path=/mnt fstype=nfs state=mounted'
#客户端卸载
ansible webs -m mount -a 'src=172.16.1.31:/data path=/mnt fstype=nfs state=absent'
cron模块
该模块适用于管理cron计划任务的。
其使用的语法跟我们的crontab文件中的语法一致,同时,可以指定以下选项:
day=#日应该运行的工作( 1-31, , /2, )hour=# 小时 ( 0-23, , /2, )minute=#分钟( 0-59, , /2, )month=# 月( 1-12, *, /2, )weekday=# 周 ( 0-6 for Sunday-Saturday,, )job=#指明运行的命令是什么name=#定时任务描述reboot# 任务在重启时运行,不建议使用,建议使用special_timespecial_time#特殊的时间范围,参数:reboot(重启时),annually(每年),monthly(每月),weekly(每周),daily(每天),hourly(每小时)state#指定状态,present表示添加定时任务,也是默认设置,absent表示删除定时任务user# 以哪个用户的身份执行
看下例子:
#每间隔5分钟执行echo test到空
[root@m01 /etc/ansible]#  ansible webs -m cron -a 'name=print_test  minute=*/5 job="echo test >/dev/null"'
172.16.1.8 | CHANGED => {
    "ansible_facts": {
        "discovered_interpreter_python": "/usr/bin/python"
    },
    "changed": true,
    "envs": [],
    "jobs": [
        "print_test"
    ]
}
172.16.1.7 | CHANGED => {
    "ansible_facts": {
        "discovered_interpreter_python": "/usr/bin/python"
    },
    "changed": true,
    "envs": [],
    "jobs": [
        "print_test"
    ]
}

#删除定时任务
[root@m01 /etc/ansible]# ansible webs -m cron -a 'name=print_test state=absent'
172.16.1.8 | CHANGED => {
    "ansible_facts": {
        "discovered_interpreter_python": "/usr/bin/python"
    },
    "changed": true,
    "envs": [],
    "jobs": []
}
172.16.1.7 | CHANGED => {
    "ansible_facts": {
        "discovered_interpreter_python": "/usr/bin/python"
    },
    "changed": true,
    "envs": [],
    "jobs": []
}
get_url模块
用以使用wget下载软件
常见选项
url:地址
dest:下载目录
看下示例:
root@m01 /etc/ansible]# ansible webs -m get_url -a 'url=https://cn.wordpress.org/latest-zh_CN.tar.gz dest=/root/'ansible之playbook
什么是playbook?
playbook是ansible用于配置,部署和管理托管主机剧本,通过playbook的详细描述,执行其中一系列tasks,可以让远程主机达到预期状态。
playbook意思为剧本 ,playbook是由以下几部分完成的
play:定义的是主机的角色。(主角还是配角,找哪个明星)
task:定义的是具体执行的任务。(角色的台词和动作)
playbook:一个或多个play(角色)组成,一个play(角色)可以包含多个task(台词,动作,大腕每集拍什么)。
playbook使用yml语法格式,后缀可以是yaml或者yml
playbook和ad-hoc的区别?
PlayBook功能比ad-hoc更全,是对ad-hoc的一种编排.PlayBook能很好的控制先后执行顺序, 以及依赖关系.PlayBook语法展现更加的直观.playbook可以持久使用,ad-hoc无法持久使用.
playbook的常用命令
playbook使用ansible-playbook命令来执行
语法格式:
ansible-playbook [options] XXX.yml常用命令:
# 检查yml文件书写是否正确
ansible-playbook --syntax-check XXX.yml
yml文件书写方式示例
#1.在客户端创建一个文件ansible.txt
#
- hosts: nfs
  tasks:
    - name: Touch file
      file:
        path: /root/ansible.txt
        state: touch


#2.安装wget软件
- hosts: 172.16.1.7
  tasks:
    - name: Install wget
      yum:
        name: wget
        state: present

#3.安装多个软件 wgetlrzsz
- hosts: 172.16.1.7
  tasks:
    - name: Install wget
      yum:
        name:
          - wget
          - lrzsz
        state: present
ansible之流程控制
变量提供了便捷的方式来管理Ansible playbook的每一个项目中的动态值,比如nginx-1.6.3这个软件包的版本,在其它地方或许会反复使用,那么如果讲此值设置为变量,然后再在其他的playbook中调用,会方便许多。如此一来还方便维护,减少维护的成本。
定义变量的方式
通过命令行进行变量定义
在play文件中进行变量定义
通过Inventory主机信息文件中进行变量定义
优先级:命令行 > playbook文件 > Inventory文件
变量定义
1.playbook中vars定义变量
playbook变量可以通过多种方式进行定义,最简单的方式就是在playbook的开头通过vars进行定义。
#方法一:
- hosts: web_group
  vars:
    packages:
      - httpd
      - mariadb-server
      - php
      - php-mysql
      - php-pdo
  tasks:
  - name: Install httpd  mariadb php Server
    yum:
      name: "{{ packages }}"

#方法二:
- hosts: web_group
  vars:
      - web_server: httpd
      - db_server: mariadb-server
      - php_server: php,php-mysql,php-pdo
   tasks:
  - name: Install httpd  mariadb php Server
    yum:
      name:
        - "{{ web_server }}"
        - "{{ db_server }}"
        - "{{ php_server }}"
#方法三:
[root@m01 ~]# cat vars.yml
- hosts: web01
  vars:
    - ngx_ver: 1.1
    - ngx_dir: web
  tasks:
    - name: touch
      file:
        path: /tmp/{{ ngx_dir }}_{{ ngx_ver }}
        state: touch
2.使用vars_files定义变量
在playbook中使用vars定义变量,有一个缺陷,就是其他的playbook无法使用该变量。所以我们可以采取第二种定义变量的方式,在vars_file中定义变量。
#定义阶段
[root@m01 ~]# cat vars1.yml
web_server: httpd
[root@m01 ~]# cat vars2.yml
db_server: mariadb-server

#调用阶段
- hosts: web_group
  vars_file:
    - ./vars1.yml
    - ./vars2.yml
  - name: Install httpd  mariadb Server
    yum:
      name:
        - "{{ web_server }}"
        - "{{ db_server }}"

#获取Ansible内置变量
- hosts: web_group
  vars:
    - remote_ip: "{{ ansible_default_ipv4.address }}"
    - remote_hostname: "{{ ansible_fqdn }}"
  tasks:
    - name: Touch IP File
      file:
        path: /root/{{ remote_ip }}
        state: touch

    - name: Touch Hostname File
      file:
        path: /root/{{ remote_hostname }}
        state: touch
3.在Inventory中定义变量
注意:在Inventory中定义变量,主机的变量要高于主机组的变量,所以该方法不推荐使用,容易将环境弄乱。
#定义阶段
[root@m01 ~]# vim /etc/ansible/hosts
[web_group]
web01 ansible_ssh_host=10.0.0.7
web02 ansible_ssh_host=10.0.0.8
[web_group:vars]
web_server=httpd
index_file=index.html

#调用阶段
- hosts: web_group
  tasks:
  - name: Install httpd Server
    yum:
      name: "{{ web_server }}"
  - name: Create Index File
    file:
      path: /tmp/{{ index_file }}
      state: touch
4.官方推荐定义方式(重点)
之前的几种变量定义都不是很好用,比较好用的是在Ansible项目目录下创建两个变量目录:host_varsgroup_vars注意目录名字一定要一致,不能做任何修改。
主机组定义变量
#定义阶段
[root@m01 ~]# mkdir group_vars

#切记定义变量的文件必须以组名为文件名
[root@m01 ~]# vim /root/group_vars/web_group.yml
web_server: httpd

#调用阶段
- hosts: web_group
  tasks:
  - name: Install httpd Server
    yum:
      name: "{{ web_server }}"
主机定义变量
#定义阶段
[root@m01 ~]# mkdir host_vars

#切记定义变量的文件必须以主机名为文件名
[root@m01 ~]# vim /root/host_vars/web01.yml
web_server: nginx

#调用阶段
- hosts: web_group
  tasks:
  - name: Install httpd Server
    yum:
      name: "{{ web_server }}"
5.命令行定义变量
通过命令行覆盖变量,Inventory的变量会被playbook文件中覆盖,这两种方式的变量都会被命令行直接指定变量所覆盖,使用--extra-vars或者-e设置变量
[root@m01 ~]# vim test.yml
- hosts: web_group
  tasks:
  - name: Install httpd Server
    yum:
      name: "{{ web_server }}"

#定义阶段
[root@m01 ~]# ansible-playbook test.yml -e "web_server=vsftpd"
变量注册
当absible的模块在运行之后,其实都会返回一些result结果,就像是执行脚本,我们有的时候需要脚本给我们一些return返回值,我们才知道,上一步是否可以执行成功,但是…默认情况下,ansible的result并不会显示出来,所以,我们可以把这些返回值’存储’到变量中,这样我们就能通过’调用’对应的变量名,从而获取到这些result,这种将模块的返回值,写入到变量中的方法被称为变量注册
那么该怎么实现变量注册呢?如下面的playbook示例
- hosts: 172.16.1.7
  tasks:
    - name: test result
      shell: nginx -t
查看执行结果
 如上执行结果可见,当我们使用shell模块执行
ls -l时,ansible给我们返回的只有changed我们无法看到执行之后的结果,所以此时我们需要使用到变量注册
- hosts: 172.16.1.7
  tasks:
    - name: test result
      shell: ls -l
      register: result	#将输出的结果存入变量result中
    - name: echo to console
      debug:	#使用debug模块将变量内容输出到屏幕上
        msg: "{{ result }}"		#调试输出的消息
查看执行结果

层级变量定义
#编辑变量文件
[root@m01 ~]# vim vars_file.yml
lamp:
  framework:
    web_package: httpd
    db_package: mariadb-server
    php_package: php

lnmp:
  framework:
    web_package: nginx
    db_package: mysql
    php_package: php

lnmt:
  framework:
    web_package: nginx
    db_package: mysql
    java_package: tomcat

#编辑playbook文件
[root@m01 ~]# vim test.yml
- hosts: web_group
  vars_files: ./vars_file.yml
  tasks:
    - name: Install LAMP httpd
      yum:
        name: "{{ lamp.framework.web_package }}"

    - name: Install LAMP mariadb-server
      yum:
        name: "{{ lamp.framework.db_package }}"

    - name: Install LAMP php
      yum:
        name: "{{ lamp.framework.php_package }}"

#官方推荐写法
[root@m01 ~]# vim test.yml
- hosts: web_group
  vars_files: ./vars_file.yml
  tasks:
    - name: Install LAMP httpd
      yum:
        name: "{{ lamp['framework']['web_package'] }}"

    - name: Install LAMP mariadb-server
      yum:
        name: "{{ lamp['framework']['db_package'] }}"

    - name: Install LAMP php
      yum:
        name: "{{ lamp['framework']['php_package'] }}"
facts缓存
Ansible facts是在被管理追击上通过Ansible自动采集发现的变量。facts包含每台特定的主机信息。比如:被控端的主机名、IP地址、系统版本、CPU数量、内存状态、磁盘状态等等。
facts使用场景
通过
facts缓存检查CPU,来生成对应的nginx配置文件通过
facts缓存检查主机名,生成不同的zabbix配置文件通过
facts缓存检索物理机的内存大小来生成不通的mysql配置文件
示例
- hosts: 172.16.1.7
  tasks:
    - name: test result
      shell: ls -l
      register: result
    - name: echo to console
      debug:
        msg: "{{ result }}"
查看结果

上图可知,未关闭facts前,执行ansible-playbook时会检测主机的信息
再看一下关闭facts之后
- hosts: 172.16.1.7
  gather_facts: no
  tasks:
    - name: test result
      shell: ls -l
      register: result
    - name: echo to console
      debug:
        msg: "{{ result }}"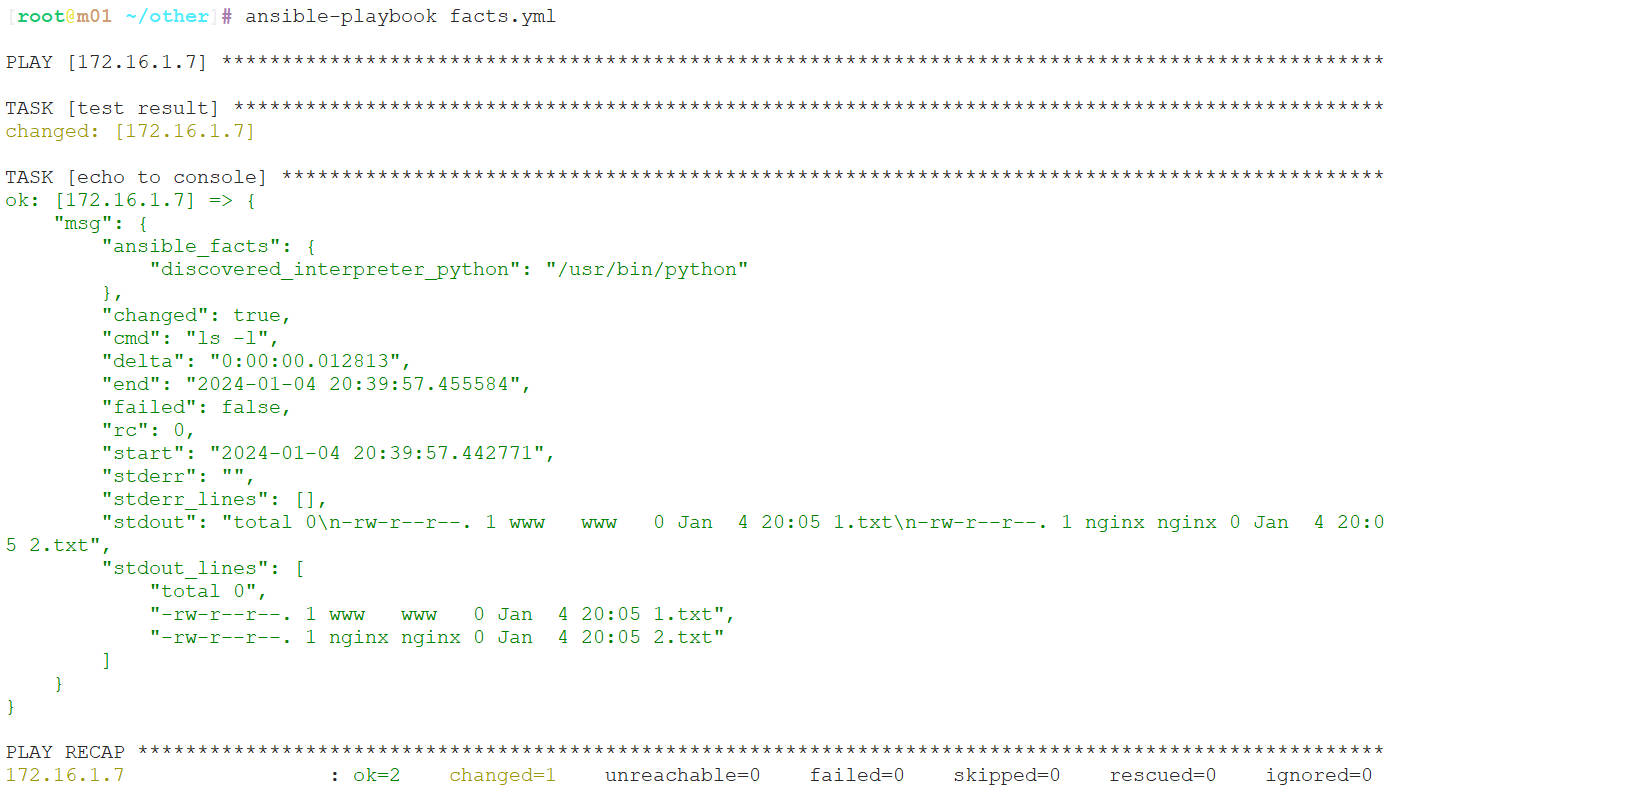
如上图可知,关闭facts之后,再执行ansible-playbook时就不会检测主机的信息了。
ansible之变量
playbook条件语句
不管是shell还是各大编程语言中,流程控制,条件判断这些都是必不可少的,在我们使用Ansible的过程中,条件判断的使用频率极其高。
例如:
1.我们使用不同的系统的时候,可以通过判断系统来对软件包进行安装。
2.在nfs和rsync安装过程中,客户端服务器不需要推送配置文件,之前我们都是写多个play,会影响效率。
3.我们在源码安装nginx的时候,执行第二遍就无法执行了,此时我们就可以进行判断是否安装过。
首先我们可以看一下示例
- hosts: web_group
  tasks:
    - name: Install CentOS Httpd
      yum:
        name: httpd
        state: present
    #官方
      when: ansible_facts['os_family'] == "CentOS"
    #非官方
      when: ansible_distribution == "CentOS"

    - name: Install Ubuntu Httpd
      yum:
        name: apache2
        state: present
      when: ansible_facts['os_family'] == "Ubuntu"
可以使用括号来对判断进行分组
tasks:
  - name: "shut down CentOS 6 and Debian 7 systems"
    command: /sbin/shutdown -t now
    when: (ansible_facts['distribution'] == "CentOS" and ansible_facts['distribution_major_version'] == "6") or
          (ansible_facts['distribution'] == "Debian" and ansible_facts['distribution_major_version'] == "7")
可以指定多个条件为一个列表
tasks:
  - name: "shut down CentOS 6 systems"
    command: /sbin/shutdown -t now
    when:
      - ansible_facts['distribution'] == "CentOS"
      - ansible_facts['distribution_major_version'] == "6"
条件运算
tasks:
  - shell: echo "only on Red Hat 6, derivatives, and later"
    when: ansible_facts['os_family'] == "RedHat" and ansible_facts['lsb']['major_release']|int >= 6
过滤返回值包含success
    - name: Check Nginx Configure
      command: /usr/sbin/nginx -t
      register: result
    - name: Restart web02
      command: /usr/sbin/reboot
      when:  result.stderr_lines is match "successful"
      或者
      when:  result.stderr_lines is search "successful"
通过register将命令执行结果保存至变量,然后通过when语句进行判断
- hosts: web_group
  tasks:
    - name: Check Httpd Server
      command: systemctl is-active httpd
      ignore_errors: yes	#如果出现错误,继续执行下面的task
      register: check_httpd

    - name: debug outprint
      debug: var=check_httpd

    - name: Httpd Restart
      service:
        name: httpd
        state: restarted
      when: check_httpd.rc == 0
接下来看一个案例
- hosts: webs
  tasks:
    - name: install wget
      yum:
        name: wget
        state: present
      when: ansible_hostname == "web01"
通过上图我们发现,我们条件只匹配到了一台,所以另外一台就不会执行
playbook循环语句
在之前的学习过程中,我们经常会有传送文件,创建目录之类的操作,创建2个目录就要写两个file模块来创建,如果要创建100个目录,我们需要写100个file模块??? 当然不是,只要有循环即可,减少重复性代码。
我们可以使用字典的方式来实现
看下例子
#创建两个文件
- hosts: 172.16.1.7
  tasks:
    - name: use loop touch file
      file:
        path: "{{ item }}"
        state: touch
      loop:
        - 1.txt
        - 2.txt

#或者
- hosts: 172.16.1.7
  tasks:
    - name: use loop touch file
      file:
        path: "{{ item.name }}"
        owner: "{{ item.owner }}"
        group: "{{ item.group }}"
        mode: "{{ item.mode }}"
        state: touch
      loop:
        - { name: 1.txt, owner: www, group: www, mode: 0644 }
        - { name: 2.txt, owner: nginx, group: nginx, mode: 0644 }
playbook handlers
handler用来执行某些条件下的任务,比如当配置文件发生变化的时候,通过notify触发handler去重启服务。
在saltstack中也有类似的触发器,写法相对Ansible简单,只需要watch,配置文件即可。
看个例子
- hosts: webs
  tasks:
    - name: add nginx repository
      yum_repository:
        name: nginx
        description: Nginx repository
        baseurl: http://nginx.org/packages/centos/7/$basearch/
        enabled: 1
        gpgcheck: 0
      when: ansible_hostname is match "web"

    - name: install nginx
      yum:
        name: nginx
        state: present
      when: ansible_hostname is match "web"

    - name: create group www
      group:
        name: www
        gid: 666

    - name: create user www
      user:
        name: www
        uid: 666
        group: 666
        shell: /sbin/nologin
        create_home: false

    - name: Configuration to nginx
      copy:
        src: ./conf_files/nginx.conf
        dest: /etc/nginx/
      notify: restart nginx service	# 监控配置文件是否发生变化
      when: ansible_hostname is match "web"

    - name: content the nginx index.html
      copy:
        content: web02......
        dest: /usr/share/nginx/html/index.html
      when: ansible_hostname is match "web"

    - name: check nginx config
      shell:
        cmd: nginx -t
      register: result
      ignore_errors: yes

    - name: echo nginx -t result
      debug:
        msg: "{{ result.rc }}"

    - name: started nginx
      systemd:
        name: nginx
        state: started
        enabled: yes
      when: ansible_hostname is match "web" and (result.rc == "0")

  handlers:	# 调用handlers,只有当notify监控的文件发生变化才会运行
    - name: restart nginx service
      systemd:
        name: nginx
        state: restarted
注意:
1.无论多少个task通知了相同的handlers,handlers仅会在所有tasks结束后运行一次。
2.Handlers只有在其所在的任务被执行时,才会被运行;如果一个任务中定义了notify调用Handlers,但是由于条件判断等原因,该任务未被执行,那么Handlers同样不会被执行。
3.Handlers只会在每一个play的末尾运行一次;如果想在一个playbook中间运行Handlers,则需要使用meta模块来实现。例如: -meta: flush_handlers。
4.如果一个play在运行到调用Handlers的语句之前失败了,那么这个Handlers将不会被执行。我们可以使用meta模块的–force-handlers选项来强制执行Handlers,即使Handlers所在的play中途运行失败也能执行。
5.不能使用handlers替代tasks
playbook任务标签
默认情况下,Ansible在执行一个playbook时,会执行playbook中定义的所有任务,Ansible的标签(tag)功能可以给单独任务甚至整个playbook打上标签,然后利用这些标签来指定要运行playbook中的个别任务,或不执行指定的任务。
打标签的方式
对一个task打一个标签
对一个task打多个标签
对多个task打一个标签
打完标签如何使用
-t:执行指定的tag标签任务
–skip-tags:执行–skip-tags之外的标签任务
示例
[root@m01 m01]# cat tag.yml
- hosts: web_group
  vars:
    - http_port: 8080
  tasks:
    - name: Install Http Server
      yum:
        name: httpd
        state: present
      tags:
        - install_httpd
        - httpd_server

    - name: configure httpd server
      template:
        src: ./httpd.j2
        dest: /etc/httpd/conf/httpd.conf
      notify: Restart Httpd Server
      tags:
        - config_httpd
        - httpd_server

    - name: start httpd server
      service:
        name: httpd
        state: started
        enabled: yes
      tags: service_httpd

  handlers:
    - name: Restart Httpd Server
      systemd:
        name: httpd
        state: restarted

#运行
[root@m01 m01]# ansible-playbook tag.yml --list-tags
[root@m01 m01]# ansible-playbook tag.yml -t httpd_server
[root@m01 m01]# ansible-playbook tag.yml -t install_httpd,confiure_httpd
[root@m01 m01]# ansible-playbook tag.yml --skip-tags httpd_server
playbook文件复用
在之前写playbook的过程中,我们发现,写多个playbook没有办法,一键执行,这样我们还要单个playbook挨个去执行,很鸡肋。所以在playbook中有一个功能,叫做include_tasks用来动态调用task任务列表。
只调用task:include_tasks
调用整个task文件:include (新版本:import_playbook)
在saltstack中,叫做top file入口文件。
看下示例
[root@m01 m01]# cat task.yml
- hosts: web_group
  vars:
    - http_port: 8080

  tasks:
    - include_tasks: task_install.yml
    - include_tasks: task_configure.yml
    - include_tasks: task_start.yml

  handlers:
    - name: Restart Httpd Server
      systemd:
        name: httpd
        state: restarted

[root@m01 m01]# cat task_install.yml
- name: Install Http Server
  yum:
    name: httpd
    state: present

[root@m01 m01]# cat task_configure.yml
- name: configure httpd server
  template:
    src: ./httpd.j2
    dest: /etc/httpd/conf/httpd.conf
  notify: Restart Httpd Server

[root@m01 m01]# cat task_start.yml
- name: start httpd server
  service:
    name: httpd
    state: started
    enabled: yes


#示例二
- include: httpd.yml
- include: nfs.yml
- include: rsync.yml


#示例三
- import_playbook: httpd.yml
- import_playbook: nfs.yml
- import_playbook: rsync.yml
playbook忽略错误
默认playbook会检测task执行的返回状态,如果遇到错误则会立即终止playbook的后续task执行,然鹅有些时候playbook即使执行错误了也要让其继续执行。
加入参数:ignore_errors:yes 忽略错误
看下例子
[root@m01 ~]# cat ignore.yml
- hosts: web_group
  tasks:
    - name: Ignore False
      command: /bin/false
      ignore_errors: yes

    - name: touch new file
      file:
        path: /tmp/test.txt
        state: touch
ansible之Jinja2模板
什么是Jinja2?
jinja2是Python的全功能模板引擎
ansible如何使用Jinja2?
使用Ansible的jinja2模板也就是使用template模块,该模块和copy模块一样,都是讲文件复制到远端主机上去,但是区别在于,template模块可以获取到文件中的变量,而copy则是原封不动的把文件内容复制过去。之前我们在推送rsync的backup脚本时,想把脚本中的变量名改成主机名,如果使用copy模块则推送过去的就是{{ ansible_fqdn }},不变,如果使用template,则会变成对应的主机名。
ansible使用Jinja2的注意事项
Ansible允许jinja2模板中使用条件判断和循环,但是不允许在playbook中使用。
注意:不是每个管理员都需要这个特性,但是有些时候jinja2模块能大大提高效率。
ansible Jinja2模板使用
基本语法
{{ EXPR }}输出变量值,会输出自定义的变量值或facts
1)playbook文件使用template模块
2)模板文件里面变量使用{{名称}},比如{{PORT}}或使用facts
我们看个示例
编辑playbook
[root@m01 ~]# vim jinja2.yml
- hosts: 172.16.1.7
  tasks:
    - name: Copy Template File
      template:
        src: ./motd.j2
        dest: /root
准备motd.j2文件
[root@m01 ~]# vim motd.j2
Welcome to {{ ansible_fqdn }}
This system total mem is : {{ ansible_memtotal_mb }} MB
This system free mem is: {{ ansible_memfree_mb }} MB
执行playbook看下结果
[root@m01 ~/other]# ansible-playbook jinja2.yml
Jinja2逻辑判断
#循环表达式
{% for i in EXPR %}
{% endfor %}

#条件判断
{% if EXPR %}
{% elif EXPR %}
{% else %}
{% endif %}

#注释
{# COMMENT #}
看个例子:
当我们实现keepalived高可用时,使用Jinja2的循环就会很方便判断,而不需要写两个件
[root@m01 ~]# vim keepalived.j2
global_defs {
    router_id {{ ansible_fqdn }}
}

vrrp_instance VI_1 {
{% if ansible_fqdn == "lb01" %}
    state MASTER
    priority 150
{% else %}
    state BACKUP
    priority 100
{% endif %}

    interface eth0
    virtual_router_id 50
    advert_int 1
    authentication {
        auth_type PASS
        auth_pass 1111
    }
    virtual_ipaddress {
        10.0.0.3
    }
}
ansible之roles
roles基本概述
roles不管是Ansible还是saltstack,我在写一键部署的时候,都不可能把所有的步骤全部写入到一个’剧本’文件当中,我们肯定需要把不同的工作模块,拆分开来,解耦,那么说到解耦,我们就需要用到roles官方推荐,因为roles的目录结构层次更加清晰。
例如:我们之前推荐大家写一个base.yml里面写所有基础优化的项目,其实把所有东西摞进去也是很鸡肋的,不如我们把这些功能全部拆分开,谁需要使用,就调用即可。
建议:每个roles最好只使用一个tasks这样方便我们去调用,能够很好的做到解耦。(SOA)
roles目录结构
1.官方推荐最佳实践目录结构定义方式
production                # inventory file for production servers
staging                   # inventory file for staging environment

group_vars/
   group1.yml             # here we assign variables to particular groups
   group2.yml
host_vars/
   hostname1.yml          # here we assign variables to particular systems
   hostname2.yml

library/                  # if any custom modules, put them here (optional)
module_utils/             # if any custom module_utils to support modules, put them here (optional)
filter_plugins/           # if any custom filter plugins, put them here (optional)

site.yml                  # master playbook
webservers.yml            # playbook for webserver tier
dbservers.yml             # playbook for dbserver tier

roles/
    common/               # this hierarchy represents a "role"
        tasks/            #
            main.yml      #  <-- tasks file can include smaller files if warranted
        handlers/         #
            main.yml      #  <-- handlers file
        templates/        #  <-- files for use with the template resource
            ntp.conf.j2   #  <------- templates end in .j2
        files/            #
            bar.txt       #  <-- files for use with the copy resource
            foo.sh        #  <-- script files for use with the script resource
        vars/             #
            main.yml      #  <-- variables associated with this role
        defaults/         #
            main.yml      #  <-- default lower priority variables for this role
        meta/             #
            main.yml      #  <-- role dependencies
        library/          # roles can also include custom modules
        module_utils/     # roles can also include custom module_utils
        lookup_plugins/   # or other types of plugins, like lookup in this case

    webtier/              # same kind of structure as "common" was above, done for the webtier role
    monitoring/           # ""
    fooapp/               # ""
2.roles目录结构使用galaxy创建
roles小技巧
创建
roles目录结构,手动使用ansible-galaxy init test role编写
roles功能在
playbook中引用
#使用galaxy构建项目
[root@m01 roles]# ansible-galaxy init rsync
- rsync was created successfully

[root@m01 ~]# cd /etc/ansible/roles/

[root@m01 roles]# tree wordpress/
nfs/                #项目名称
├── defaults        #低优先级变量
├── files           #存放文件
├── handlers        #触发器文件
├── meta            #依赖关系文件
├── tasks           #工作任务文件
├── templates       #jinja2模板文件
├── tests           #测试文件
└── vars            #变量文件
3.roles运行
最后写一个总的size.yml文件,将需要运行的role写在这个文件中,最后执行site.yml文件
[root@m01 roles]# cat /etc/ansible/roles/site.yml
- hosts: backup
  remote_user: root
  roles:
    - rsync
ansible roles依赖关系
roles允许你再使用roles时自动引入其他的roles。role依赖关系存储在roles目录中meta/main.yml文件中。
例如:推送wordpress并解压,前提条件,必须要安装nginx和php,把服务跑起来,才能运行wordpress的页面,此时我们就可以在wordpress的roles中定义依赖nginx和php的roles
[root@m01 roles]# vim /etc/ansible/roles/wordpress/meta/main.yml
dependencies:
  - { role: nginx }
  - { role: php }
如果编写了meta目录下的main.yml文件,那么Ansible会自动先执行meta目录中main.yml文件中的dependencies文件,如上所示,就会先执行nginx和php的安装。
ansible Galaxy
Galaxy是一个免费网站,类似于github网站,网站上基本都是共享roles,从Galaxy下载roles是最快启动项目方式之一。
Galaxy官方网站:TP
ansible提供了一个命令ansible-galaxy,可以用来对roles项目进行初始化,查找,安装,移除等操作
[root@m01 roles]# ansible-galaxy --help
Usage: ansible-galaxy [delete|import|info|init|install|list|login|remove|search|setup] [--help] [options] ...

Perform various Role related operations.

Options:
  -h, --help            show this help message and exit
  -c, --ignore-certs    Ignore SSL certificate validation errors.
  -s API_SERVER, --server=API_SERVER
                        The API server destination
  -v, --verbose         verbose mode (-vvv for more, -vvvv to enable
                        connection debugging)
  --version             show program's version number, config file location,
                        configured module search path, module location,
                        executable location and exit

 See 'ansible-galaxy <command> --help' for more information on a specific
command.
1.使用galaxy搜索项目
[root@m01 roles]# ansible-galaxy search openvpn

Found 103 roles matching your search:

 Name                                      Description
 ----                                      -----------
 AdrienKuhn.fail2ban                       Configure fail2ban jails
 AdrienKuhn.ufw                            Configure firewall with UFW
 alexiscangelosi.openvpn                   Ansible role openvpn
 andrelohmann.easy_rsa                     ansible galaxy role to deploy easy-rsa
 andrelohmann.openvpn                      ansible galaxy role to deploy an openvpn server
 antoniobarbaro.openvpn-client             Install openvpn client, configure and start service
 arillso.openvpn                           Configurate your OpenVPN Client
 asm0dey.ansible_role_openvpn              OpenVPN playbook for CentOS/Fedora/RHEL/RHEL clones & Ubuntu/Debian
 barbudone.pritunl_server                  Pritunl for EL Linux.
 blaet.openvpn                             OpenVPN playbook for CentOS/Fedora/RHEL/RHEL clones & Ubuntu/Debian
 bmcclure.pia                              Manages Private Internet Access VPN utilizing the AUR and openvpn on Archlinux
 borkenpipe.ansible_openvpn                OpenVPN with PKI for Ubuntu/Debian
 borkenpipe.openvpn                        Install OpenVPN for us with AWS bastions.
 borkenpipe.stouts_openvpn                 Manage OpenVPN server
 cinject.openvpn                           Openvpn role
 clvx.easy-rsa                             Role to generate an openvpn pki.
 clvx.openvpn                              Role to deploy server and openvpn clients.
 cornfeedhobo.openvpn                      Install and manage OpenVPN
 d3atiq.openvpn_client                     A role for automatic managed connection to OpenVPN VPN.
 danrabinowitz.openvpn_for_access          This role provisions an OpenVPN server. This server is NOT designed for routing all traffic from the client. It is for granting access to the server, so that ssh (for example) can be allowed ONLY
 dresden-weekly.openvpn                    collection of Ansible roles to run OpenVPN.
 edeckers.openvpn-ldap                     Installs an OpenLDAP backed OpenVPN-server
 egeneralov.openvpn                        Provision openvpn servers
 ehime.openvpn                             OpenVPN playbook for CentOS/Fedora/RHEL/RHEL clones & Ubuntu/Debian
 escapace.ansible_openvpn                  openvpn role
 gavika.easy_rsa                           Install and configure EasyRSA
 gavika.openvpn                            Role to install and configure OpenVPN server and generate client configurations
 gregorydulin.ansible_role_openvpn         OpenVPN playbook for CentOS/Fedora/RHEL/RHEL clones & Ubuntu/Debian
 grycap.openvpn                            Install OpenVPN to create hybrid clusters with EC3
 iamsudipt.openvpn                         OpenVpn ansible role for creating a secure tunnel to your private infra.
 icasimpan.ansible_role_openvpn            OpenVPN playbook for CentOS/Fedora/RHEL/RHEL clones & Ubuntu/Debian
 ieguiguren.nordvpn                        downloads NordVPN servers' list and set it up
 indigo-dc.openvpn                         Install OpenVPN to create hybrid clusters with EC3
 indix.openvpn-ops                         This repo can be used to create a openvpn server.
 iroquoisorg.openvpn                       manage openvpn server
 iroquoisorg.openvpn_client                install openvpn client
 jtyr.openvpn                              Role which helps to install and configure OpenVPN server.
 juju4.openvpnclient                       setup openvpn as client
 kbrebanov.openvpn                         Installs and configures OpenVPN
 kbrebanov.openvpn_as                      Installs and configures OpenVPN Access Server
 kharkevich.pritunl                        Deploy pritunl: Enterprise Distributed OpenVPN and IPsec Server.
 kostyrevaa.openvpn                        Installs and configures openvpn client
 kyl191.openvpn                            OpenVPN playbook for CentOS/Fedora/RHEL/RHEL clones & Ubuntu/Debian
 leafnode.openvpn_client                   install openvpn client
 linuxhq.iproute                           RHEL/CentOS - Advanced IP routing and network device configuration tools
 linuxhq.openvpn_client                    RHEL/CentOS - The Open Source VPN (client)
2. 查看详细信息
[root@m01 roles]# ansible-galaxy search openvpn

Found 103 roles matching your search:

 Name                                      Description
 ----                                      -----------
 AdrienKuhn.fail2ban                       Configure fail2ban jails
 AdrienKuhn.ufw                            Configure firewall with UFW
 alexiscangelosi.openvpn                   Ansible role openvpn
 andrelohmann.easy_rsa                     ansible galaxy role to deploy easy-rsa
 andrelohmann.openvpn                      ansible galaxy role to deploy an openvpn server
 antoniobarbaro.openvpn-client             Install openvpn client, configure and start service
 arillso.openvpn                           Configurate your OpenVPN Client
 asm0dey.ansible_role_openvpn              OpenVPN playbook for CentOS/Fedora/RHEL/RHEL clones & Ubuntu/Debian
 barbudone.pritunl_server                  Pritunl for EL Linux.
 blaet.openvpn                             OpenVPN playbook for CentOS/Fedora/RHEL/RHEL clones & Ubuntu/Debian
 bmcclure.pia                              Manages Private Internet Access VPN utilizing the AUR and openvpn on Archlinux
 borkenpipe.ansible_openvpn                OpenVPN with PKI for Ubuntu/Debian
 borkenpipe.openvpn                        Install OpenVPN for us with AWS bastions.
 borkenpipe.stouts_openvpn                 Manage OpenVPN server
 cinject.openvpn                           Openvpn role
 clvx.easy-rsa                             Role to generate an openvpn pki.
 clvx.openvpn                              Role to deploy server and openvpn clients.
 cornfeedhobo.openvpn                      Install and manage OpenVPN
 d3atiq.openvpn_client                     A role for automatic managed connection to OpenVPN VPN.
 danrabinowitz.openvpn_for_access          This role provisions an OpenVPN server. This server is NOT designed for routing all traffic from the client. It is for granting access to the server, so that ssh (for example) can be allowed ONLY
 dresden-weekly.openvpn                    collection of Ansible roles to run OpenVPN.
 edeckers.openvpn-ldap                     Installs an OpenLDAP backed OpenVPN-server
 egeneralov.openvpn                        Provision openvpn servers
 ehime.openvpn                             OpenVPN playbook for CentOS/Fedora/RHEL/RHEL clones & Ubuntu/Debian
 escapace.ansible_openvpn                  openvpn role
 gavika.easy_rsa                           Install and configure EasyRSA
 gavika.openvpn                            Role to install and configure OpenVPN server and generate client configurations
 gregorydulin.ansible_role_openvpn         OpenVPN playbook for CentOS/Fedora/RHEL/RHEL clones & Ubuntu/Debian
 grycap.openvpn                            Install OpenVPN to create hybrid clusters with EC3
 iamsudipt.openvpn                         OpenVpn ansible role for creating a secure tunnel to your private infra.
 icasimpan.ansible_role_openvpn            OpenVPN playbook for CentOS/Fedora/RHEL/RHEL clones & Ubuntu/Debian
 ieguiguren.nordvpn                        downloads NordVPN servers' list and set it up
 indigo-dc.openvpn                         Install OpenVPN to create hybrid clusters with EC3
 indix.openvpn-ops                         This repo can be used to create a openvpn server.
 iroquoisorg.openvpn                       manage openvpn server
 iroquoisorg.openvpn_client                install openvpn client
 jtyr.openvpn                              Role which helps to install and configure OpenVPN server.
 juju4.openvpnclient                       setup openvpn as client
 kbrebanov.openvpn                         Installs and configures OpenVPN
 kbrebanov.openvpn_as                      Installs and configures OpenVPN Access Server
 kharkevich.pritunl                        Deploy pritunl: Enterprise Distributed OpenVPN and IPsec Server.
 kostyrevaa.openvpn                        Installs and configures openvpn client
 kyl191.openvpn                            OpenVPN playbook for CentOS/Fedora/RHEL/RHEL clones & Ubuntu/Debian
 leafnode.openvpn_client                   install openvpn client
 linuxhq.iproute                           RHEL/CentOS - Advanced IP routing and network device configuration tools
 linuxhq.openvpn_client                    RHEL/CentOS - The Open Source VPN (client)
3.安装项目
[root@m01 roles]# ansible-galaxy install kyl191.openvpn
- downloading role 'openvpn', owned by kyl191
评论区